> ## Documentation Index
> Fetch the complete documentation index at: https://docs.pinecone.io/llms.txt
> Use this file to discover all available pages before exploring further.
# Amazon Bedrock
> Connect Pinecone and Amazon Bedrock to ship vector search and RAG: embed, index, and query at scale with managed infrastructure.
export const PrimarySecondaryCTA = ({primaryLabel, primaryHref, primaryTarget, secondaryLabel, secondaryHref, secondaryTarget}) =>
{primaryLabel && primaryHref &&
}
{secondaryLabel && secondaryHref &&
}
 ## Setup guide
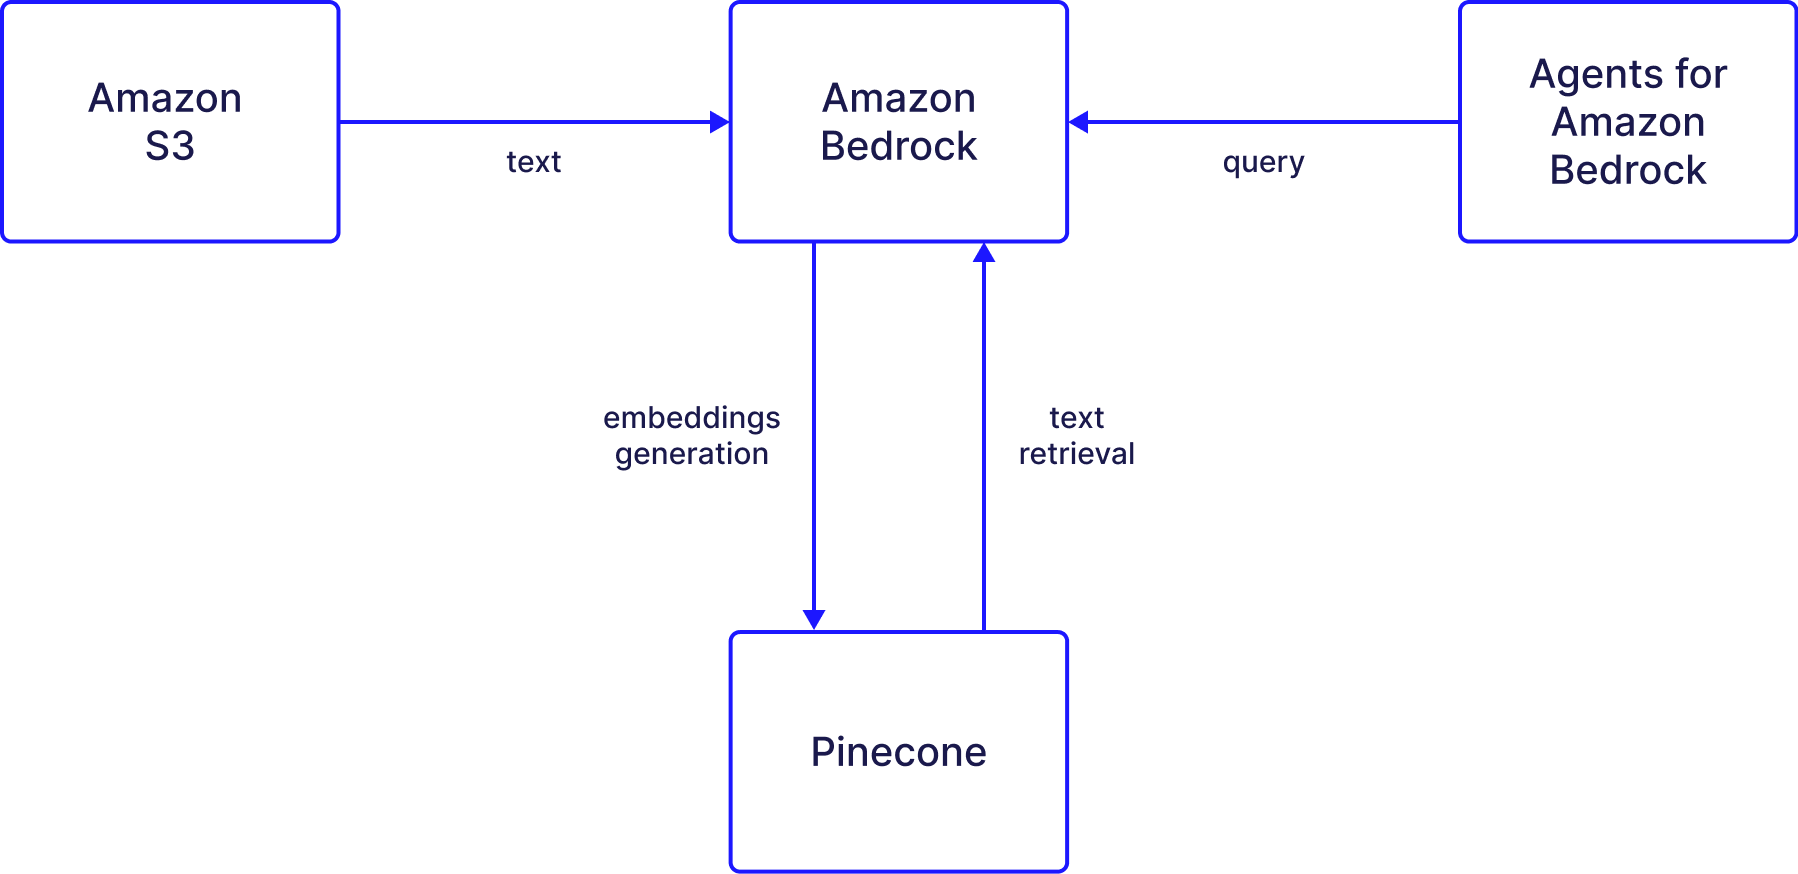
The process of using a Bedrock knowledge base with Pinecone works as follows:
Create an empty Pinecone index with an embedding model in mind. The index must be empty for Bedrock integration.
Upload sample data to Amazon S3.
Sync data with Bedrock to create embeddings saved in Pinecone.
Use the knowledge base to reference the data saved in Pinecone.
Agents can interact directly with the Bedrock knowledge base, which will retrieve the semantically relevant content.
### 1. Create a Pinecone index
The knowledge base stores data in a Pinecone index. Decide which [supported embedding model](https://docs.aws.amazon.com/bedrock/latest/userguide/models-supported.html) to use with Bedrock before you create the index, as your index's dimensions will need to match the model's. For example, the AWS Titan Text Embeddings V2 model can use dimension sizes 1024, 384, and 256.
After signing up to Pinecone, follow the [quickstart guide](/guides/get-started/quickstart) to create your Pinecone index and retrieve your `apiKey` and index host from the [Pinecone console](https://app.pinecone.io).
Your index must have the same dimensions as the model you will later select for creating your embeddings. Also, your index must be empty. All data must be ingested through Bedrock's sync process.
### 2. Set up your data source
#### Set up secrets
After setting up your Pinecone index, you'll have to create a secret in [AWS Secrets Manager](https://console.aws.amazon.com/secretsmanager/newsecret):
1. In the **Secret type** section, select **Other type of secret**.
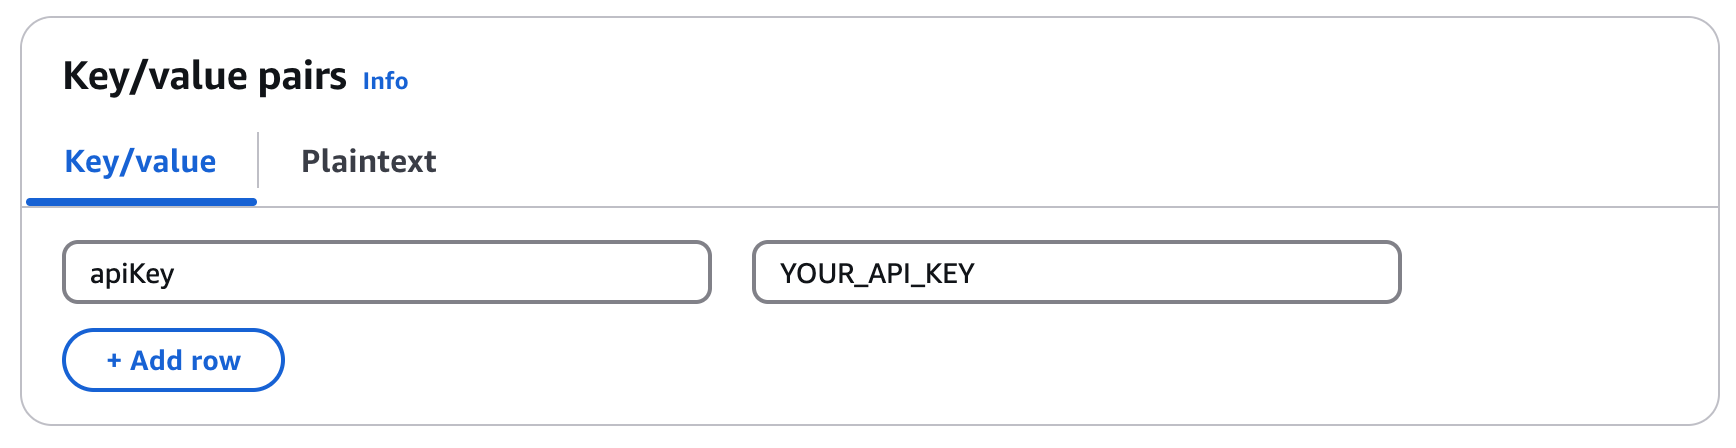
2. In the **Key/value pairs** section, enter a key value pair for the Pinecone API key name and its respective value. For example, use `apiKey` and the API key value.
## Setup guide
The process of using a Bedrock knowledge base with Pinecone works as follows:
Create an empty Pinecone index with an embedding model in mind. The index must be empty for Bedrock integration.
Upload sample data to Amazon S3.
Sync data with Bedrock to create embeddings saved in Pinecone.
Use the knowledge base to reference the data saved in Pinecone.
Agents can interact directly with the Bedrock knowledge base, which will retrieve the semantically relevant content.
### 1. Create a Pinecone index
The knowledge base stores data in a Pinecone index. Decide which [supported embedding model](https://docs.aws.amazon.com/bedrock/latest/userguide/models-supported.html) to use with Bedrock before you create the index, as your index's dimensions will need to match the model's. For example, the AWS Titan Text Embeddings V2 model can use dimension sizes 1024, 384, and 256.
After signing up to Pinecone, follow the [quickstart guide](/guides/get-started/quickstart) to create your Pinecone index and retrieve your `apiKey` and index host from the [Pinecone console](https://app.pinecone.io).
Your index must have the same dimensions as the model you will later select for creating your embeddings. Also, your index must be empty. All data must be ingested through Bedrock's sync process.
### 2. Set up your data source
#### Set up secrets
After setting up your Pinecone index, you'll have to create a secret in [AWS Secrets Manager](https://console.aws.amazon.com/secretsmanager/newsecret):
1. In the **Secret type** section, select **Other type of secret**.
2. In the **Key/value pairs** section, enter a key value pair for the Pinecone API key name and its respective value. For example, use `apiKey` and the API key value.
 3. Click **Next**.
4. Enter a **Secret name** and **Description**.
5. Click **Next** to save your key.
6. On the **Configure rotation** page, select all the default options in the next screen, and click **Next**.
7. Click **Store**.
8. Click on the new secret you created and save the secret ARN for a later step.
#### Set up S3
The knowledge base is going to draw on data saved in S3. For this example, we use a [sample of research papers](https://huggingface.co/datasets/jamescalam/ai-arxiv2-semantic-chunks) obtained from a dataset. This data will be embedded and then saved in Pinecone.
1. Create a new general purpose bucket in [Amazon S3](https://console.aws.amazon.com/s3/home).
2. Once the bucket is created, upload a CSV file.
The CSV file must have a field for text that will be embedded, and a field for metadata to upload with each embedded text.
3. Save your bucket's address (`s3://…`) for the following configuration steps.
### 3. Create a Bedrock knowledge base
To [create a Bedrock knowledge base](https://console.aws.amazon.com/bedrock/home?#/knowledge-bases/create-knowledge-base), use the following steps:
1. Enter a **Knowledge Base name**.
2. In the **Choose data source** section, select **Amazon S3**.
3. Click **Next**.
4. On the **Configure data source** page, enter the **S3 URI** for the bucket you created.
5. If you do not want to use the default chunking strategy, select a chunking strategy.
6. Click **Next**.
### 4. Connect Pinecone to the knowledge base
Now you will need to select an embedding model to configure with Bedrock and configure the data sources.
1. Select the embedding model you decided on earlier.
2. For the **Vector database**, select **Choose a vector store you have created** and select **Pinecone**.
3. Mark the check box for authorizing AWS to access your Pinecone index.
Ensure your Pinecone index is empty before proceeding. Bedrock cannot work with indexes that contain existing data. All data must be ingested through Bedrock's sync process.
4. For the **Endpoint URL**, enter the Pinecone index host retrieved from the Pinecone console.
5. For the **Credentials secret ARN**, enter the secret ARN you created earlier.
6. In the **Metadata field mapping** section, enter the **Text field name** you want to embed and the **Bedrock-managed metadata field name** that will be used for metadata managed by Bedrock (e.g., `metadata`).
7. Click **Next**.
8. Review your selections and complete the creation of the knowledge base.
9. On the [Knowledge Bases](https://console.aws.amazon.com/bedrock/home?#/knowledge-bases) page select the knowledge base you just created to view its details.
10. Click **Sync** for the newly created data source.
Sync the data source whenever you add new data to the data source to start the ingestion workflow of converting your Amazon S3 data into vector embeddings and upserting the embeddings into the vector database. Depending on the amount of data, this whole workflow can take some time.
### 5. Create and link an agent to Bedrock
Lastly, [create an agent](https://console.aws.amazon.com/bedrock/home?#/agents) that will use the knowledge base for retrieval:
1. Click **Create Agent**.
2. Enter an **Name** and **Description**.
3. Click **Create**.
4. Select the LLM provider and model you'd like to use.
5. Provide instructions for the agent. These will define what the agent is trying to accomplish.
6. In the **Knowledge Bases** section, select the knowledge base you created.
7. Prepare the agent by clicking **Prepare** near the top of the builder page.
8. Test the agent after preparing it to verify it is using the knowledge base.
9. Click **Save and exit**.
Your agent is now set up and ready to go! In the next section, we'll show how to interact with the newly created agent.
#### Create an alias for your agent
In order to deploy the agent, create an alias for it that points to a specific version of the agent. Once the alias is created, it will display in the agent view.
1. On the [Agents](https://console.aws.amazon.com/bedrock/home?#/agents) page, select the agent you created.
2. Click **Create Alias**.
3. Enter an **Alias name** and **Description**.
4. Click **Create alias**.
#### Test the Bedrock agent
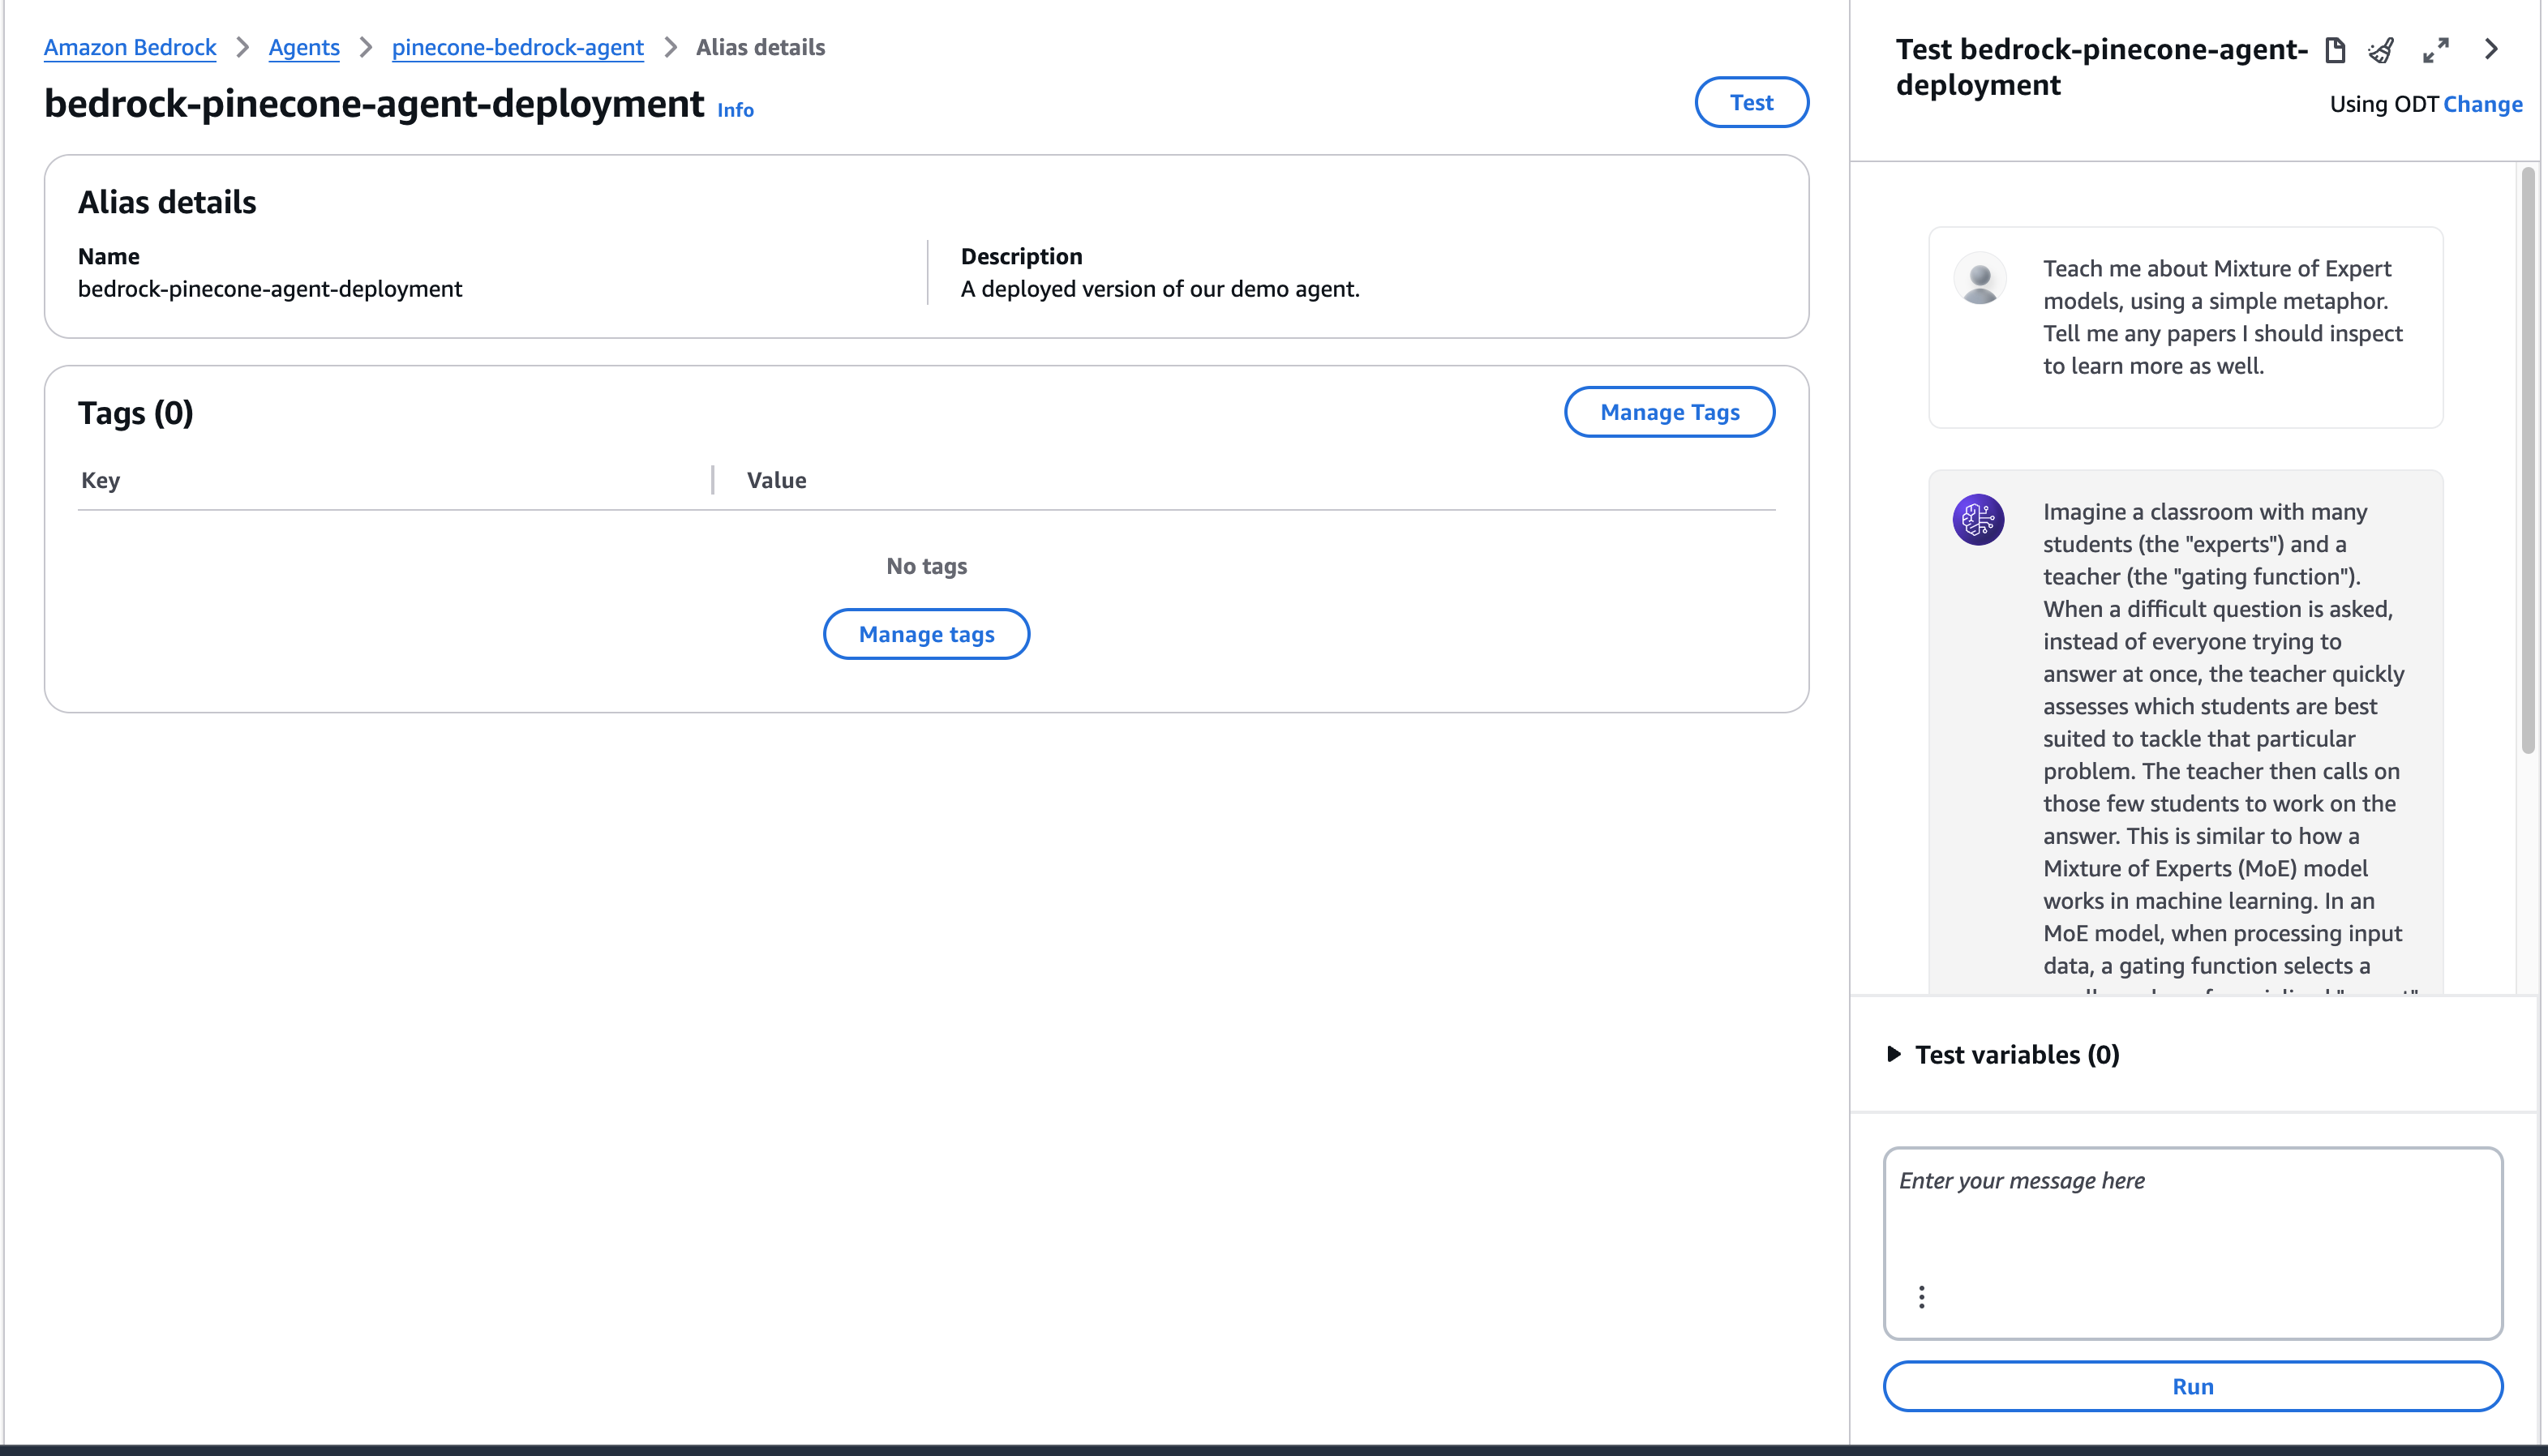
To test the newly created agent, use the playground on the right of the screen when we open the agent.
In this example, we used a dataset of research papers for our source data. We can ask a question about those papers and retrieve a detailed response, this time with the deployed version.
3. Click **Next**.
4. Enter a **Secret name** and **Description**.
5. Click **Next** to save your key.
6. On the **Configure rotation** page, select all the default options in the next screen, and click **Next**.
7. Click **Store**.
8. Click on the new secret you created and save the secret ARN for a later step.
#### Set up S3
The knowledge base is going to draw on data saved in S3. For this example, we use a [sample of research papers](https://huggingface.co/datasets/jamescalam/ai-arxiv2-semantic-chunks) obtained from a dataset. This data will be embedded and then saved in Pinecone.
1. Create a new general purpose bucket in [Amazon S3](https://console.aws.amazon.com/s3/home).
2. Once the bucket is created, upload a CSV file.
The CSV file must have a field for text that will be embedded, and a field for metadata to upload with each embedded text.
3. Save your bucket's address (`s3://…`) for the following configuration steps.
### 3. Create a Bedrock knowledge base
To [create a Bedrock knowledge base](https://console.aws.amazon.com/bedrock/home?#/knowledge-bases/create-knowledge-base), use the following steps:
1. Enter a **Knowledge Base name**.
2. In the **Choose data source** section, select **Amazon S3**.
3. Click **Next**.
4. On the **Configure data source** page, enter the **S3 URI** for the bucket you created.
5. If you do not want to use the default chunking strategy, select a chunking strategy.
6. Click **Next**.
### 4. Connect Pinecone to the knowledge base
Now you will need to select an embedding model to configure with Bedrock and configure the data sources.
1. Select the embedding model you decided on earlier.
2. For the **Vector database**, select **Choose a vector store you have created** and select **Pinecone**.
3. Mark the check box for authorizing AWS to access your Pinecone index.
Ensure your Pinecone index is empty before proceeding. Bedrock cannot work with indexes that contain existing data. All data must be ingested through Bedrock's sync process.
4. For the **Endpoint URL**, enter the Pinecone index host retrieved from the Pinecone console.
5. For the **Credentials secret ARN**, enter the secret ARN you created earlier.
6. In the **Metadata field mapping** section, enter the **Text field name** you want to embed and the **Bedrock-managed metadata field name** that will be used for metadata managed by Bedrock (e.g., `metadata`).
7. Click **Next**.
8. Review your selections and complete the creation of the knowledge base.
9. On the [Knowledge Bases](https://console.aws.amazon.com/bedrock/home?#/knowledge-bases) page select the knowledge base you just created to view its details.
10. Click **Sync** for the newly created data source.
Sync the data source whenever you add new data to the data source to start the ingestion workflow of converting your Amazon S3 data into vector embeddings and upserting the embeddings into the vector database. Depending on the amount of data, this whole workflow can take some time.
### 5. Create and link an agent to Bedrock
Lastly, [create an agent](https://console.aws.amazon.com/bedrock/home?#/agents) that will use the knowledge base for retrieval:
1. Click **Create Agent**.
2. Enter an **Name** and **Description**.
3. Click **Create**.
4. Select the LLM provider and model you'd like to use.
5. Provide instructions for the agent. These will define what the agent is trying to accomplish.
6. In the **Knowledge Bases** section, select the knowledge base you created.
7. Prepare the agent by clicking **Prepare** near the top of the builder page.
8. Test the agent after preparing it to verify it is using the knowledge base.
9. Click **Save and exit**.
Your agent is now set up and ready to go! In the next section, we'll show how to interact with the newly created agent.
#### Create an alias for your agent
In order to deploy the agent, create an alias for it that points to a specific version of the agent. Once the alias is created, it will display in the agent view.
1. On the [Agents](https://console.aws.amazon.com/bedrock/home?#/agents) page, select the agent you created.
2. Click **Create Alias**.
3. Enter an **Alias name** and **Description**.
4. Click **Create alias**.
#### Test the Bedrock agent
To test the newly created agent, use the playground on the right of the screen when we open the agent.
In this example, we used a dataset of research papers for our source data. We can ask a question about those papers and retrieve a detailed response, this time with the deployed version.
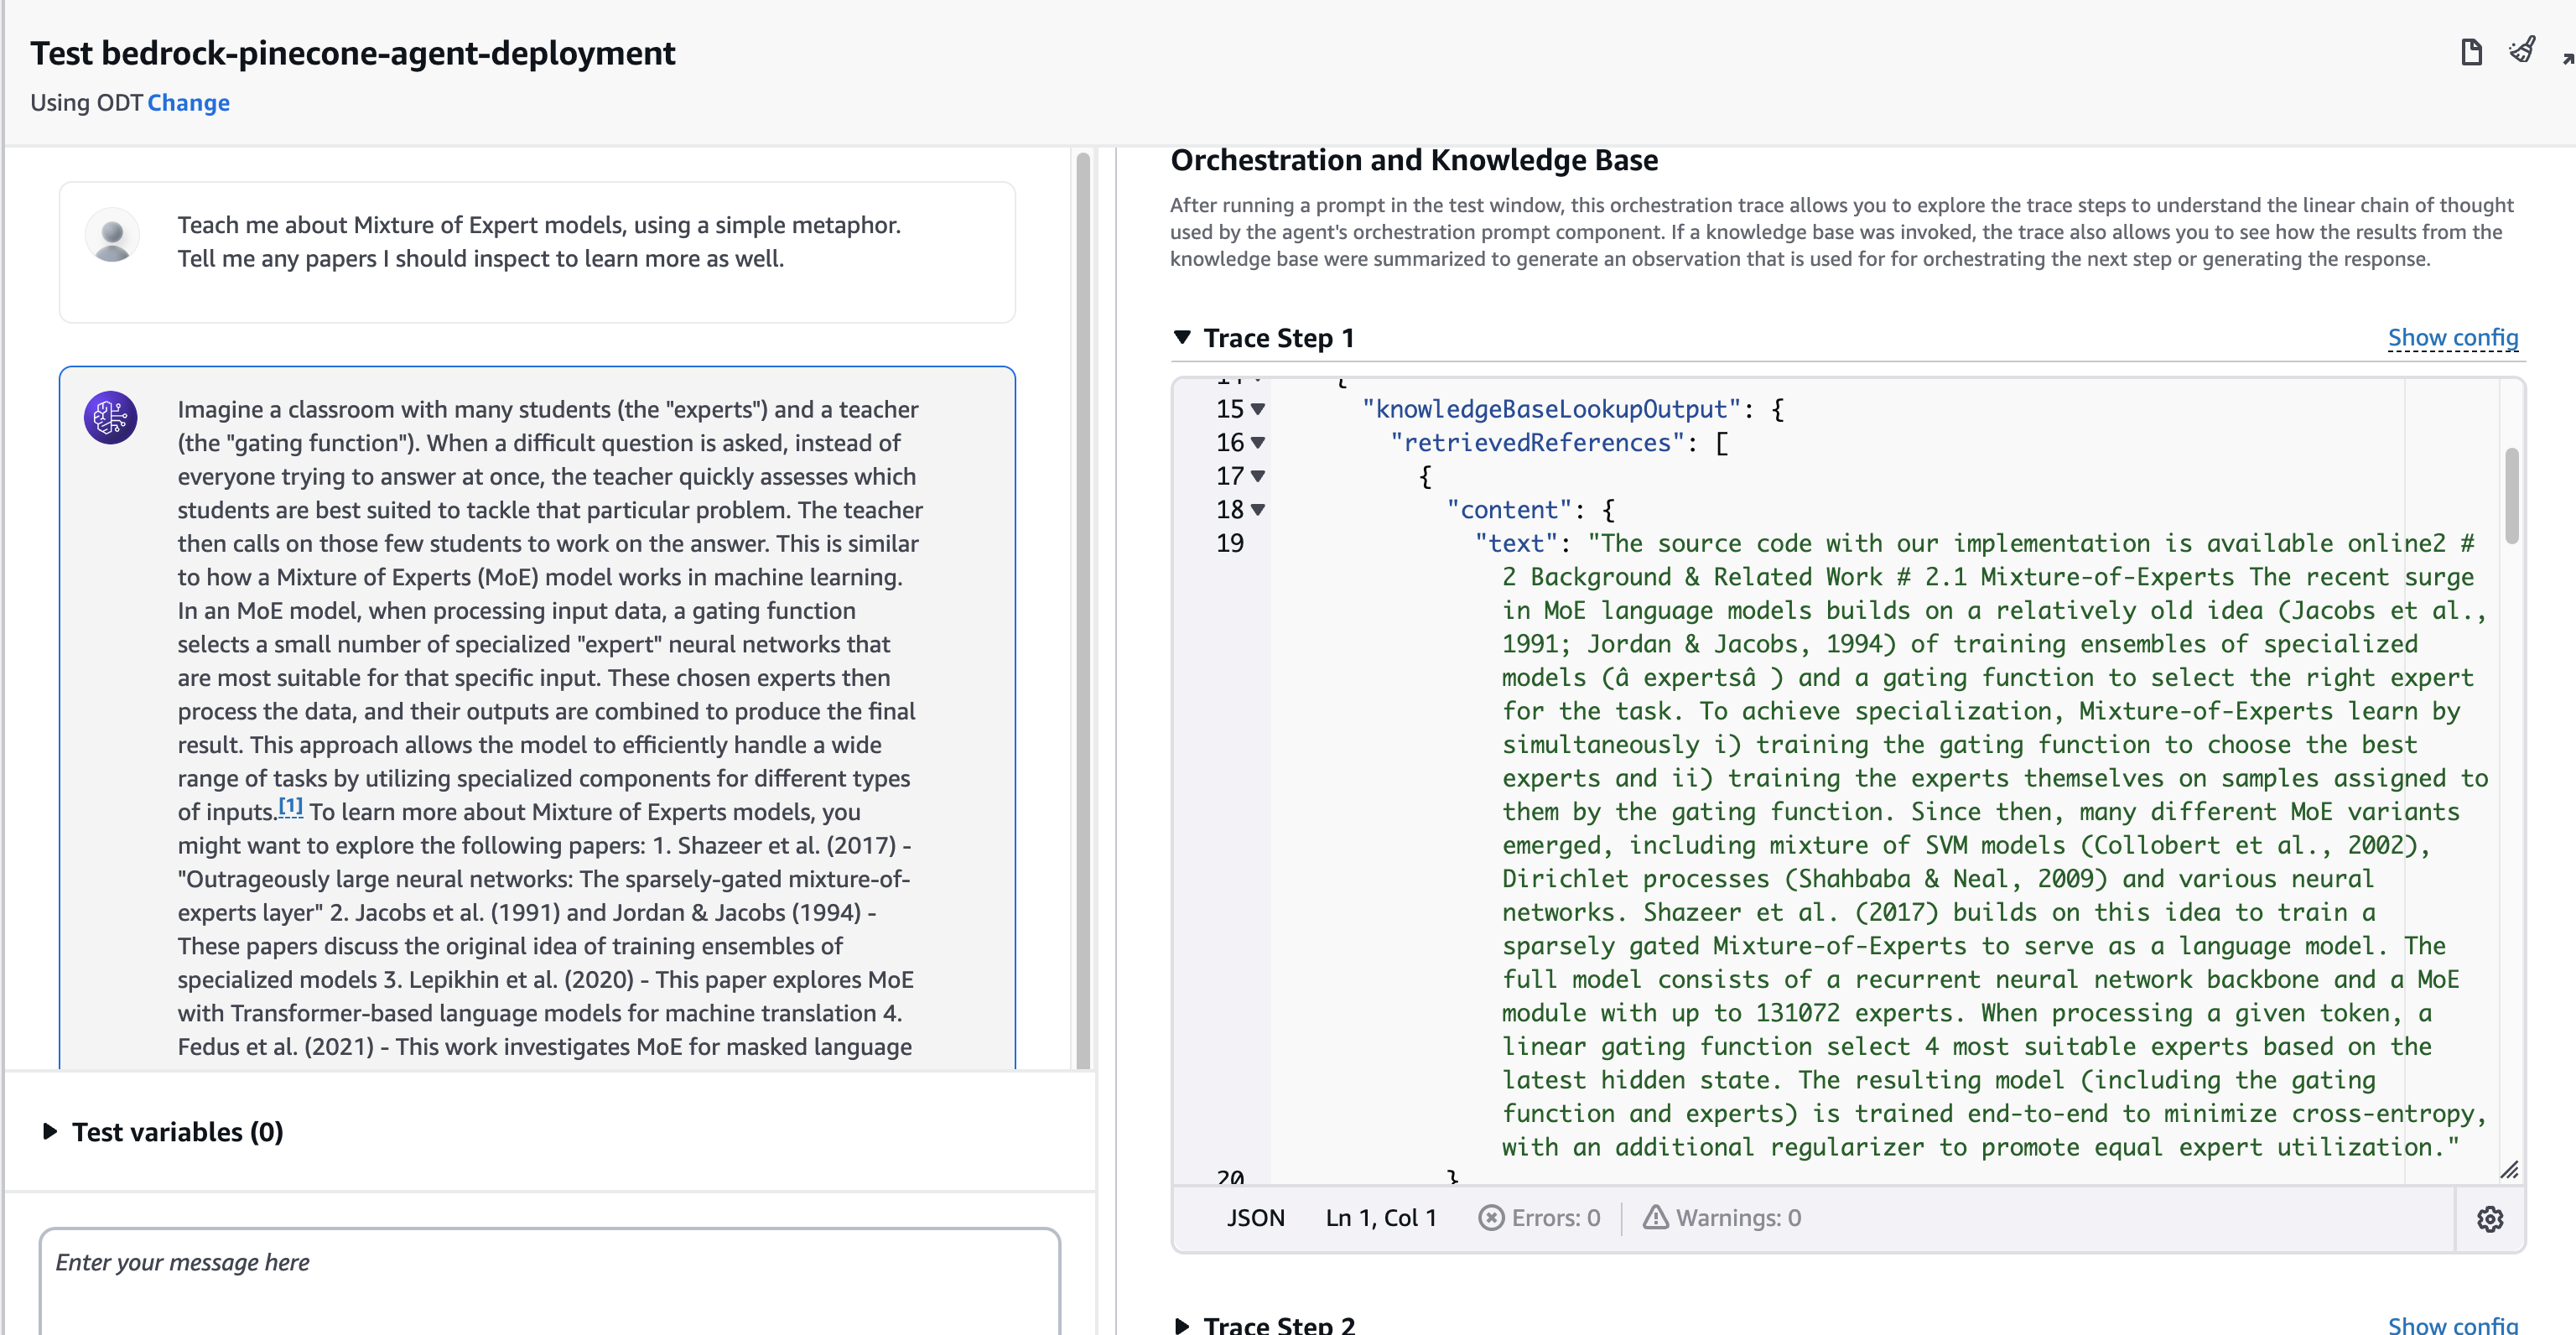
 By inspecting the trace, we can see what chunks were used by the Agent and diagnose issues with responses.
 ## Related articles
* [Pinecone as a Knowledge Base for Amazon Bedrock](https://www.pinecone.io/blog/amazon-bedrock-integration/)
## Related articles
* [Pinecone as a Knowledge Base for Amazon Bedrock](https://www.pinecone.io/blog/amazon-bedrock-integration/)