Bring your own cloud (BYOC) lets you deploy Pinecone Database in your own AWS or GCP account to ensure data sovereignty and compliance, with Pinecone handling provisioning, operations, and maintenance.
BYOC is in public preview on AWS and GCP. To learn more about the offering, contact Pinecone.
Pinecone BYOC is designed for organizations with high security and compliance requirements, for example:
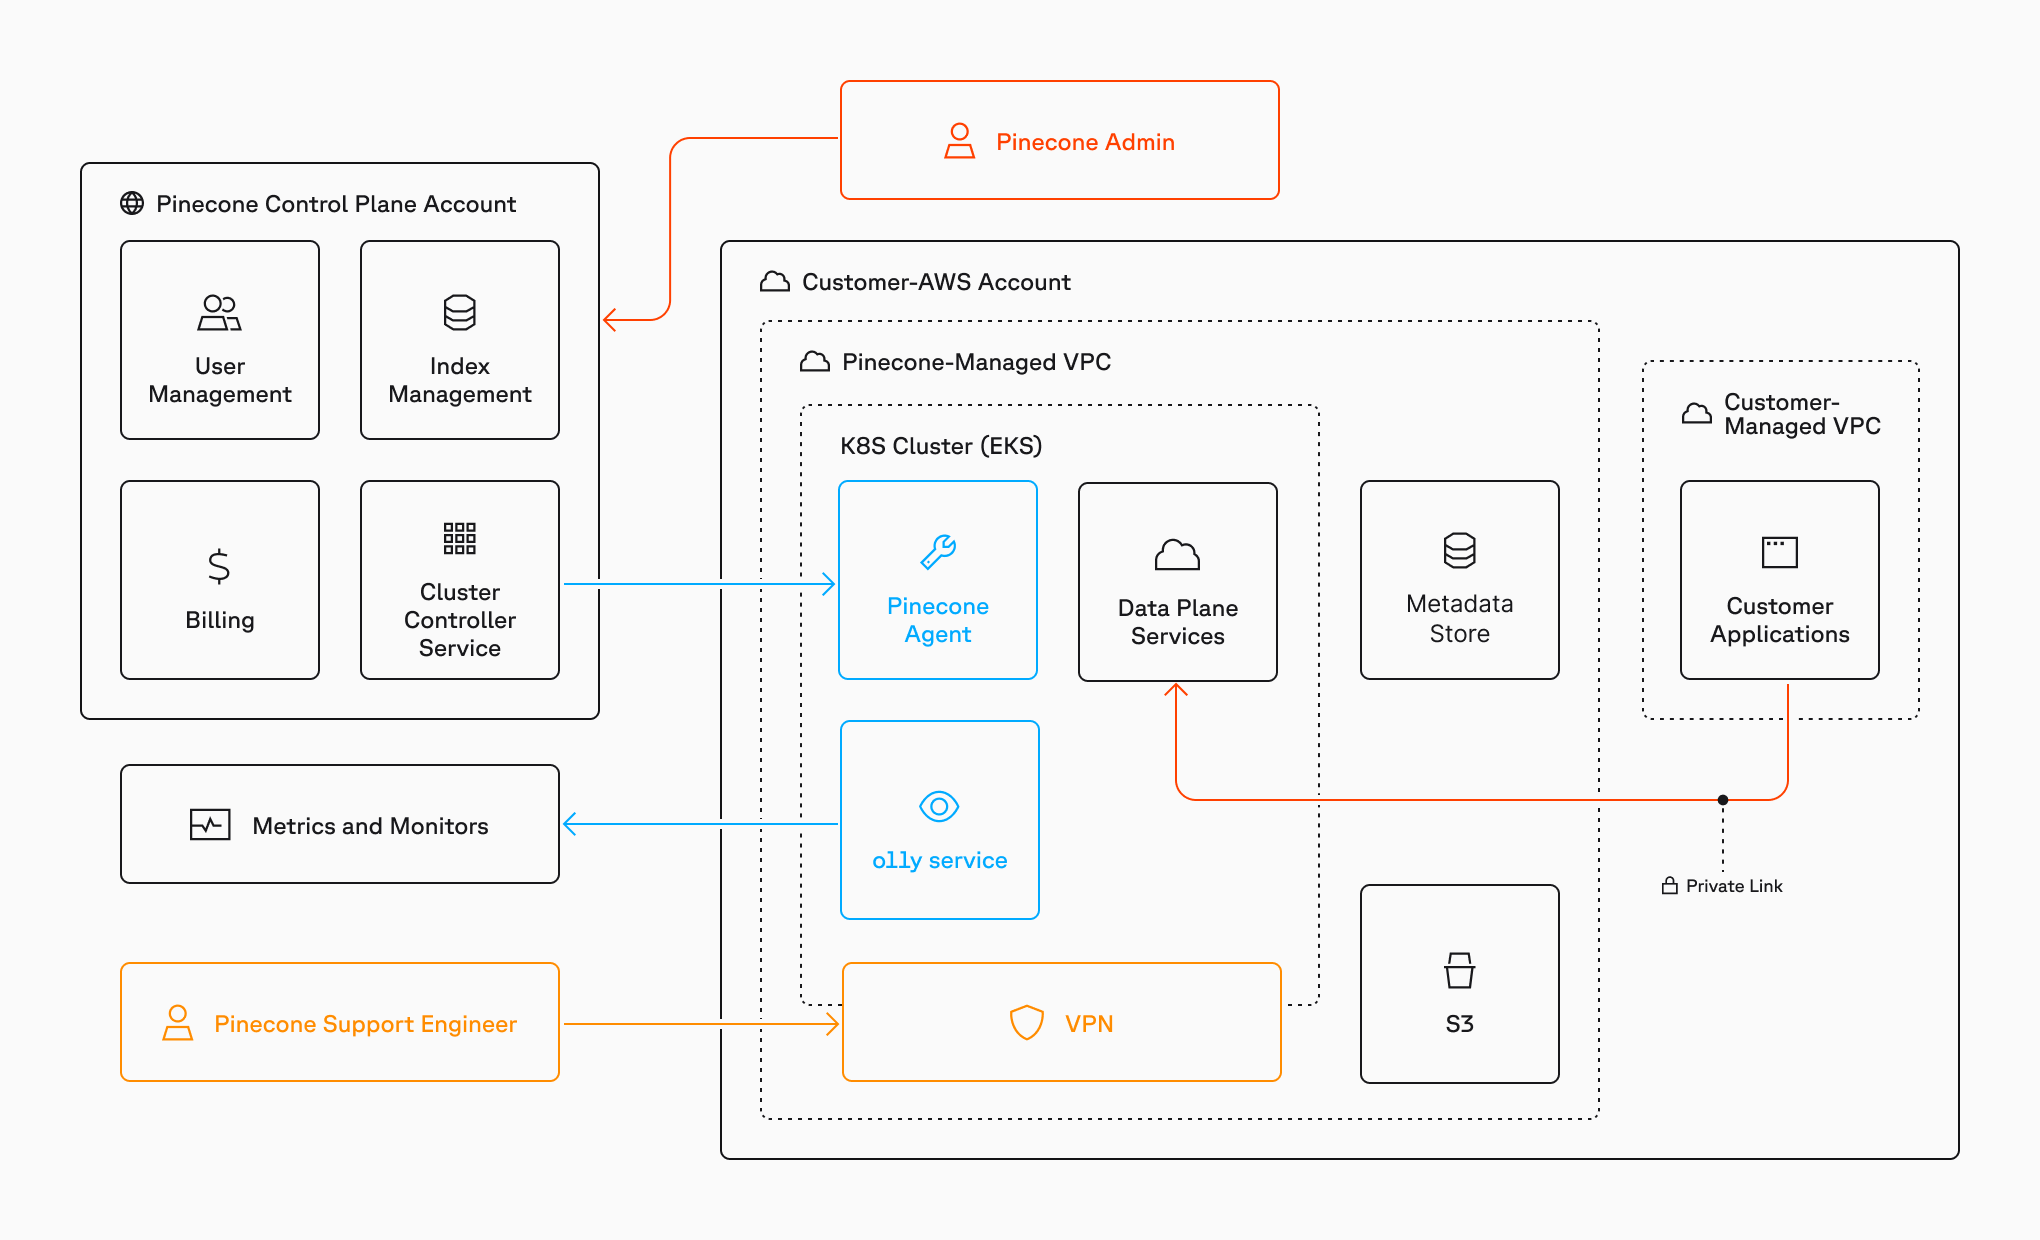
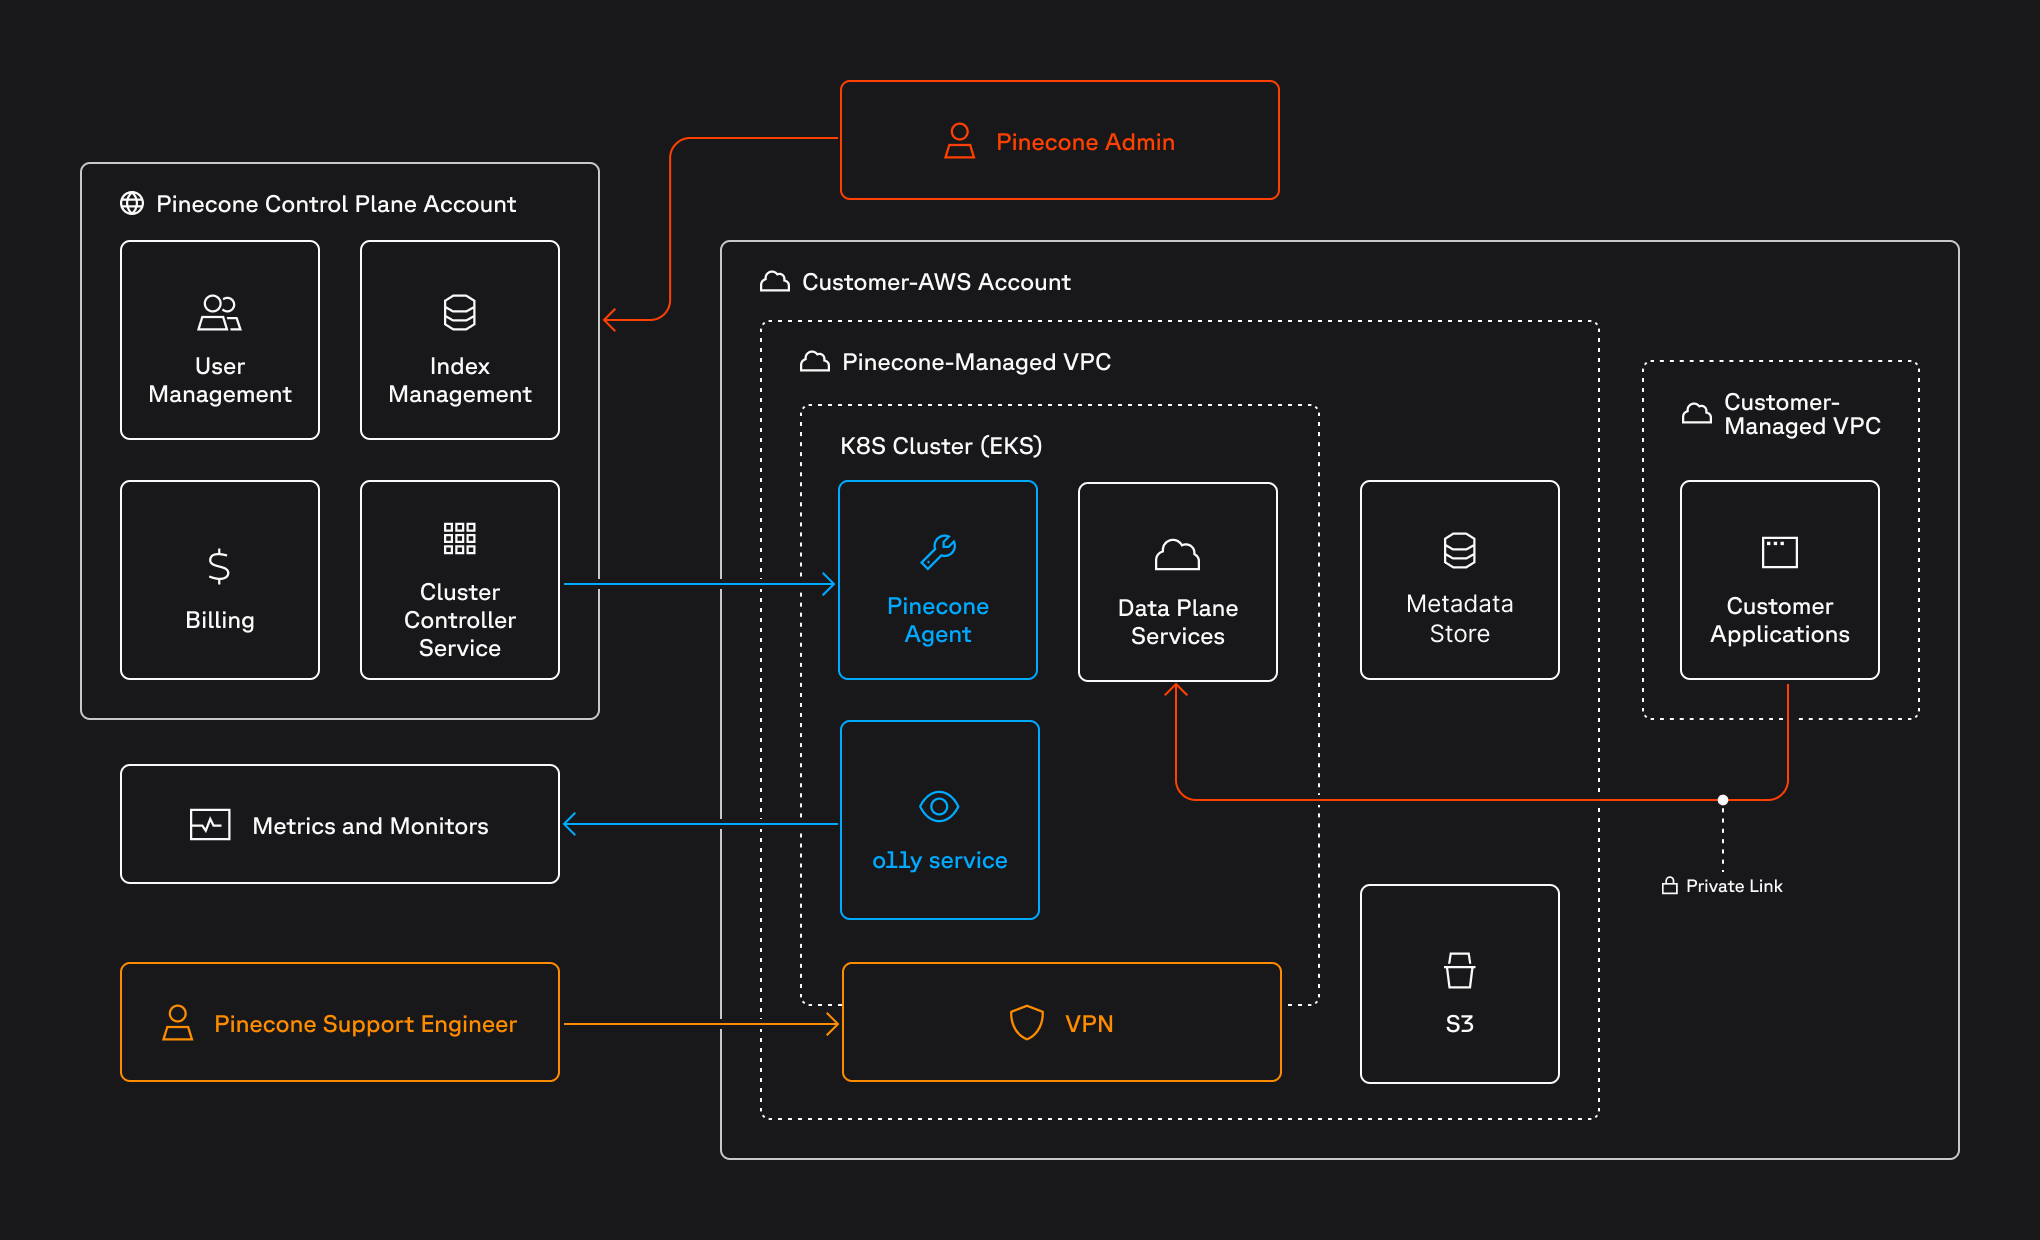
The BYOC architecture employs a split model:
The onboarding process for BYOC in AWS or GCP involves the following general stages:
Set up AWS or GCP account
If you don’t already have an AWS or GCP account where you want to deploy Pinecone, you create one for this purpose.
Execute Terraform template
You download and run a Terraform template provided by Pinecone. This template creates essential resources, including an IAM role with scoped-down permissions and a trust relationship with Pinecone’s AWS or GCP account.
Create environment
Pinecone deploys a data plane cluster within a dedicated VPC in your AWS or GCP account, and you configure a private endpoint for securely connecting to your indexes via AWS PrivateLink or GCP Private Service Connect.
Validate
Once the environment is operational, Pinecone performs validation tests to ensure proper functionality.
You use a private endpoint to securely connect to your BYOC indexes. On AWS, you use the AWS PrivateLink service; on GCP, you use the GCP Private Service Connect service.
Follow the instructions in the AWS documentation to create a VPC endpoint for connecting to your indexes via AWS PrivateLink.
For Resource configurations, select the relevant resource for your Pinecone BYOC deployment.
For Network settings, select the VPC for your BYOC deployment.
In Additional settings, select Enable DNS name to allow you to access your indexes using a DNS name.
Create a private endpoint
Follow the instructions in the GCP documentation to create a private endpoint for connecting to your indexes via GCP Private Service Connect.
Set the Target service to the following:
Copy the IP address of the private endpoint. You’ll need it later.
Create a private DNS zone
Follow the instructions in the GCP documentation to create a private DNS zone.
Set the DNS name to the following:
Select the same VPC network as the private endpoint.
Add a resource record set
Follow the instructions in the GCP documentation to add a resource record set.
Set the DNS name to *.
Set the Resource record type to A.
Set the Ipv4 Address to the IP address of the private endpoint.
Once your BYOC environment is ready, you can create a BYOC index in the Pinecone console or via Pinecone API or Python SDK.
To create a BYOC index, set the spec
parameter to the environment name provided to you during onboarding, for example:
BYOC does not support reading and writing data from the index browser in the Pinecone console.
Once your private endpoint is configured, you can run data operations against an index as usual, but you must target the index using its private endpoint URL. The only difference in the URL is that .svc.
is changed to .svc.private.
.
You can get the private endpoint URL for an index from the Pinecone console or API.
To get the private endpoint URL for an index from the Pinecone console:
To get the private endpoint URL for an index from the API, use the describe_index
operation, which returns the private endpoint URL as the private_host
value:
The response includes the private endpoint URL as the private_host
value:
If you run data operations against an index from outside the Private Endpoint, you will get an Unauthorized
response.
Pinecone engineers monitor the state of your BYOC deployment and manage incidents if they arise. In addition, you can monitor performance metrics for your BYOC indexes in the Pinecone Console or with Prometheus or Datadog.
To use Prometheus, your monitoring tool must have access to your VPC.
BYOC does not support the following:
Integrated embedding, which relies on models hosted by Pinecone that are outsite of your AWS or GCP account.
Reading and writing data from the index browser in the Pinecone console. You must use the Pinecone API or SDKs instead.
Using customer-managed encryption keys (CMEK) to secure data within a Pinecone project.
Also, to monitor performance metrics with Prometheus, you must configure Prometheus within your VPC.
What is the difference between BYOC and Pinecone's standard service?
In the standard service, Pinecone manages all cloud resources and includes their cost in the service fee. In BYOC, customers provision and pay for cloud resources directly through their AWS or GCP account, providing greater control and data sovereignty as well as access to available AWS or GCP credits or discounts.
Also, BYOC does not support certain features. See Limitations for details.
How is data secured in BYOC?
Data is stored and processed exclusively within the customer’s AWS or GCP account, with encryption applied at rest and in transit. Communication between the data plane and control plane is encrypted using TLS, and access is controlled via RBAC and scoped IAM permissions. AWS PrivateLink or GCP Private Service Connect is used for secure data plane API calls.
Is BYOC available in other cloud providers?
Currently, BYOC is available in AWS and GCP. Support for Azure is planned for future releases.